The main focus of my animation was to create a character with personality and expression. I chose to animate a teddy bear, which is a favourite children’s toy, to see one showing both positive and negative human emotions would be an excellent contrast that the young audience could relate to. My research into human expressions linked to behaviour was interesting and it informed my decision as to what to incorporate, I came up with various ideas before deciding on my final choice.
By concentrating on the behaviour and the emotional features of the animation, the storyline was only ever hinted at and the audience would not be able to see the little girl (the owner of the bear). On reflection the teddy bear character with his textured grey patchwork exterior appears to be mean and moody, which gives emphasis to the negative emotions. However, this may mean that he is not so appealing to a young audience, especially four year old children. To balance this I decided to end the animation on a positive note; the bear gives a cheeky wink to show he is happy again.
For me the most challenging aspect of this assignment was acquiring the skills needed to create a professional animation. The difficulty was getting the character to look and act exactly how I wanted. It was important that I created a good range of movement in my character, combined with the use of sound effects to highlight each individual emotion. However, when I attempted to combine the movement of the bear with the emotion I had several problems. The technical features required to produce the animation did not always work, especially when it came to making the ears move and attaching the head to the body. I had to settle for the ears moving backwards and forwards, rather than up and down to indicate sadness. I was successful in solving the problem of attaching the head to the body. To make a more elaborate animation that I would be happier with, would require more time than what was available to me.
Whilst creating my 3D animation I have gained more experience in solid surface detailed modelling. I have become skilled at using FFD box tool; I found it useful when moving eyes and eyebrows as it gave a fun cartoon element to the character. However, it was not suitable for what I intended for my animation as I wanted to keep an element of realism to the emotions displayed by my bear. I have also gained knowledge in the use of physique modifier, skinning and rigging animation techniques as I am able to produce characters with movements that are specifically focused on targeted body parts. These are skills and techniques that I can adapt and develop for future projects.
Tuesday, 12 April 2011
Sunday, 10 April 2011
Finished Animation


I made the opening and ending titles in Adobe Photoshop then exported them into Premiere Pro. I rendered it out and the animation was now finished.
Wednesday, 6 April 2011
Editing in Premiere Pro
The animation was edited in Adobe Premiere Pro. I made the specifications 16x9 ratios the same as the rendered files.
I then added all 30 rendered clips put them side-by-side. Then I used the cut and drag tool to edit the lengths so that the animation flowed well and the different cameras angles eased fluidity. I added dip to black effect in different parts of the animation to help show that a period of time had past.
I added audio sound clips to help make the character sound real and to help give emphasis to the facial expressions.
Saturday, 2 April 2011
Rendering

When the animation was completed I rendered out the scenes. I would have preferred to use skylights and other lighting, but it was going to take a long time to render out, unfortunately it would not have been completed in time for the deadline, if used it would have taken me 400 hours to do all my renders, due to time constraints I chose not to use them. This meant my render times of more than five minutes per frame went down to approximately four seconds per frame at 1280x720 to give it and 16x9 ratios.
Friday, 25 March 2011
Animating
The uses of the biped helped to give Patchy a clean flowing movement for his head and arms to help the behavioural expressions.
The uses of the rotate tool helped to roll the eyelids to create the right expressions. E.g. roll them all the way up for a shocked look or roll them inward for an angry stare.
I had to switch between both auto key and set key for the reason that some times set key would not let me set a key and sometimes auto key would not work.
I have created various different animation scenes, for the final project which included three different camera angles that make 30 scenes needed to be rendered.
Thursday, 24 March 2011
Animation Problem

When animating Patchy I used the biped to move his head and neck. I used the two ponytails for his ears to help with showing expressions through body language.
I had a problem moving the ears, when I selected the ponytails to move the ears; the rotate tool was not in the right place. I went into settings and tried to move the rotation tool back in the right place. Also, when I moved the rotation tool the ear would move as well, even when the “affect pivot only” button was selected, I found this very time consuming. I tried to solve the problem, I moved the ears back into place free hand, however the ears were very difficult to animate. Eventually, I made the decision not to move the ears again, which was a shame as the ears were going to help me emphasise the expressions e.g. when Patchy was sad the ears would move down. This would be something I would go back and fix if I had time.
I had a problem moving the ears, when I selected the ponytails to move the ears; the rotate tool was not in the right place. I went into settings and tried to move the rotation tool back in the right place. Also, when I moved the rotation tool the ear would move as well, even when the “affect pivot only” button was selected, I found this very time consuming. I tried to solve the problem, I moved the ears back into place free hand, however the ears were very difficult to animate. Eventually, I made the decision not to move the ears again, which was a shame as the ears were going to help me emphasise the expressions e.g. when Patchy was sad the ears would move down. This would be something I would go back and fix if I had time.
Sunday, 20 March 2011
Cameras


I used three different cameras to get different angles to help show Patchy‘s expressions in the animation. The first camera is a side shot of Patchy. The second camera is a front shot of the body and the third camera is a zoomed in face shot.
Friday, 18 March 2011
Character Expressions


I have given Patchy the bear seven facial expressions in this animation as these show off his emotions and personality. They are: Anger, Confusion, Happy, Normal, Sad, Sleeping and Surprised.
Friday, 11 March 2011
Background and Props

Once Patchy was created I then started to make the background and props that was needed for the story. I made the two walls by using two plans and added a pink colour to them since Patchy’s owner is a young girl although, you do not see her in the animation.
I used a box to form the shelf and added a purple colour to it. Then using a sphere I created the ball; afterwards I added a checked texture to it.
I used a box to form the shelf and added a purple colour to it. Then using a sphere I created the ball; afterwards I added a checked texture to it.
Adding Materials

The bears name is Patchy because the texture that I desired was going to be patchwork style. I found an image of a grey carpet that I was able to edit in Adobe Photoshop; I cut it up into two different shades, dark and light. To create a contrast I used the dark shades for his outer skin and the lighter shade for the inner skin.
To get the texture in the right place, I highlighted areas with the polygons and in polygon: Material IDs I set IDs to different selected areas of Patchy this enabled me to add different parts of materials to him. I then applied material editor and using Multi/Sub-object I selected the number of IDs I used and added the materials to the selected IDs.
To get the texture in the right place, I highlighted areas with the polygons and in polygon: Material IDs I set IDs to different selected areas of Patchy this enabled me to add different parts of materials to him. I then applied material editor and using Multi/Sub-object I selected the number of IDs I used and added the materials to the selected IDs.
Friday, 4 March 2011
Biped and Physique

A biped was created and rigged into place with the model using the physique modifier. I found that this was a much more straightforward method of rigging the character than using the skin and bone modifiers that I have used in the past. However there are downsides, there is less controlling the envelopes and limits when setting very specific weights on certain limbs.
Friday, 25 February 2011
Modelling Patchy Part 2


It got to the stage where I preferred one half of the model than the other. This was due to the fact that I was creating this free hand. In order to correct this, I deleted the half that I did not like and used the symmetry modifier, which made it easier to model since I only had to edit one side of the model.
For the nose I use the same method as the body and the head and attached it to the character. The eyes were created using spheres and adjusting the hemisphere to 0.15 to create the pupil. I copied the eye and adjusting the hemisphere to 0.5 to create the eyelids.
I placed an FFD box around the eyes to make them deformable for animation. I then attached them to the body by using the select and link tool this enabled me to continue to edit the eyes when animating them.
I placed an FFD box around the eyes to make them deformable for animation. I then attached them to the body by using the select and link tool this enabled me to continue to edit the eyes when animating them.
Using a cylinder I made a mouth shape then made copies, with the intention of keeping the mouth the same size. I was then able to edit them in different shapes for the expression I needed for my animation and linked them to the model using the ‘select and link tool’ and going in to object properties I made the visibility to 0 so when it come to animating I could make the mouth visible when needed and invisible when not needed for the right expressions.
Friday, 18 February 2011
Modelling Patchy Part1


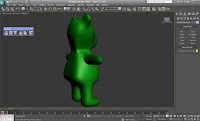
The model got underway with using a box, which I started shaping, using the edit poly modifier and moving polygons and vertex’s around to get a teddy bear shape body. I used the poly modifier and extruding tool in order to make the various parts of his body including each of the legs and arms.
The head was created as a separate object. I applied the same technologies that were used on the body, to get a teddy bear shape head. I extruded out parts for his ears.
I then attached the head to the body and had to weld the vertexes together, which was not easy since some of the vertexes would not weld no mater what I attempted to do. I solved the problem by deleting some parts of both the head and the body and using the tools ‘create and cut’ in edit geometry section, I created new polygons and was able to attach the two parts together.
Monday, 14 February 2011
Storyboard (behaviour and expression of emotion)
Scene 1 – Title Patchy the Bear with Patchy sitting on the shelf.
Scene 2 - Patchy asleep (Snoring) on the shelf, with a ball next to him.
Scene 3 – Patchy waking up (Shocked) to find out that he has been placed on the shelf.
Scene 4 – Patchy confused (Hmm thinking) why has he been placed on the shelf?
Scene 5 – Patchy angry (Arrr) hits the shelf (Bangs) three times.
Scene 6 – Patchy still angry hits the ball and the ball rolls of the shelf. (Ball rolling sound)
Scene 7 – Patchy shocked watches the ball bouncing around the room. (Ball bouncing sound)
Scene 8 – Patchy closes his eyes when the ball breaks (Smash) an object.
Scene 9 – Patchy opens his eyes and looks sad (trombone) for breaking the object and drops his head down.
Scene 10 – Patchy still upset (Sniff) hears his owner looking for him, Patchy sits up with a smile (Ping).
Scene 11 – Patchy happy that his owner finds him winks (Ding).
Scene 12 – Fade to black, end credits.
Monday, 7 February 2011
Body Language Research
I have researched body language; this is an important aspect to animation, as it assisted me in developing my bear’s body language and movements. By using animated body language, it enabled me to make the facial expressions look more convincing.
Business Ball
[Online] Available at:
http://www.businessballs.com/body-language.htm
[Accessed 7th February 2011]
This website takes about body language and how to read body language signs and gestures - non-verbal communications - male and female, for work, social, dating, and mating relationships. It also look at the different signals, body parts the possible meanings and detailed explanation.
Face Expressions Research


In order to create a believable character I have researched different facial expressions, these have helped me to develop my own bear’s facial expressions.
Woman facial expressions
[Online] Available at:
http://drmills.wiki-site.com/images/c/c7/Woman-facial-expressions.jpg
[Accessed 7th February 2011]
Cartoon facial expressions
[Online] Available at:
http://drawinghowtodraw.com/stepbystepdrawinglessons/wp-content/uploads/2010/01/howtodrawfacialexpressions.png
[Accessed 7th February 2011]
Man facial expressions
[Online] Available at:
http://s3.amazonaws.com/readers/2010/12/28/facialexpressions_1.jpg
[Accessed 7th February 2011]
Thursday, 3 February 2011
Character Profile
My name is Patchy, I was like any other teddy waiting for someone to buy me then one day I was selected out of all the teddies in the shop and was placed in a gift box. Sometime later a girl opened the gift box and was so happy to see me. Everything was going great, until I found myself stuck on a bedroom shelf.
Address: My owner’s bed.
Telephone: Is that what the box shaped thing is that people talk on?
Email: I do not know what that is.
Born: I was made on 2nd June 2010
Gender: Boy
Hobby: I love playing outdoor games with my owner and having tea parties with her other toys.
I like most pop songs, but I do not like it when my owner starts singing along with them.
I like reading books but I do not like it when my owner reads the page faster than I do.
I like watching the television with my owner.
Some times she gets upset and I am there for her when she needs a hug.
Tuesday, 1 February 2011
Mood board
 My mood board was created using different images of teddy bears to help get various ideas of what my character might look like and to help develop a detailed behaviour profile.
Saturday, 29 January 2011
Idea Development
My initial idea was around a teddy bear, the most familiar of all toys. The animation would show different moods of the teddy bear. I found I could develop the human emotions by giving the animation a brief story line. The teddy bear is a sleep and wakes up to find that it has been placed on a shelf and get confused and angry about it.
Friday, 28 January 2011
Research: Animated Characters
Empire: The 50 Best Animated Movie Characters
[Online] Available at:
http://www.empireonline.com/features/50-greatest-animated-characters/
[Accessed 28th January 2011]
This website focuses on the greatest hand-drawn, CG and stop-motioned personalities that are currently available.
Having been introduced to animation at a young age and I still watch them to this today, means that I have seen a lot of animated movies and an assortment of characters so I am familiar with what has already been done and what is available.
This website has a select range of characters that helped me with ideas to develop my own character and its personality which, reminded me of the different appearance, hopes, dreams, fears and wants that are associated with human emotions.
Initial Brief
The aim of this assignment is to design and produce an animation of a cartoon character aimed at four to fourteen year olds. The main focus of the animation is developing a character with personality and expression; hence more focus on animation rather then modelling. For me, the best start for this project was to carry out some research into human expressions linked to identifiable behaviour, and initiate various ideas in order to decide what the character will look and act like.
Subscribe to:
Posts (Atom)